In this article, I record steps I took to build a state-controlled Pagination component from scratch using React, Vite, ChakraUI and react-icons.
TL:DR
- Project setting
- Design Pagination props
- Code our Pagination
- When to show the break label?
- Implement
usePaginationList - Wrap up
- References
Project setting
To start our project, let’s use React + vite as our starter kit. As for the UI library, I am going to choose ChakraUI. And the icons will use react-icons md ( Material Design Icons ).
1# terminal
2
3# install React
4$ npm create vite@latest
5$ cd YOUR_PROJECT
6$ npm i
7
8# install ChakraUI
9$ npm i @chakra-ui/react @emotion/react @emotion/styled framer-motion
10
11# install react-icons
12$ npm install react-icons --save
After installing all packages, let’s do a little bit of config.
In our main.tsx , wrap our App with ChakraProvider .
1// src/main.tsx
2
3import React from "react";
4import ReactDOM from "react-dom/client";
5import App from "./App.tsx";
6
7import { ChakraProvider } from "@chakra-ui/react";
8
9ReactDOM.createRoot(document.getElementById("root")!).render(
10  <React.StrictMode>
11    <ChakraProvider>
12      <App />
13    </ChakraProvider>
14  </React.StrictMode>
15);
Next step, create a file called Pagination.tsx which will be our Pagination component.
1// src/Pagination.tsx
2
3import { Box } from "@chakra-ui/react";
4
5const Pagination = () => {
6  return <Box>this is pagination</Box>;
7};
8
9export default Pagination;
We are going to import Pagination into App.tsx :
1// src/App.tsx
2
3import Pagination from "./Pagination";
4
5function App() {
6  return (
7    <>
8      hi <Pagination />
9    </>
10  );
11}
12
13export default App;
After all basic settings, our project tree should now looks like this:
1.
2├── README.md
3├── index.html
4├── package-lock.json
5├── package.json
6├── src
7│   ├── App.tsx
8│   ├── Pagination.tsx
9│   ├── main.tsx
10│   └── vite-env.d.ts
11├── tsconfig.json
12├── tsconfig.node.json
13└── vite.config.ts
Design Pagination props
Let’s use MUI Pagination as our reference, your can try the MUI demo in order to get deeper understanding on what we are going to build later.

As the image shown above, the component can break into 5 parts:
- firstPageButton: when clicked, go back to page 1
- prevPageButton: when clicked, go back to a page before
- pageList: all the page numbers, including the
...break label - nextPageButton: when clicked, go to next page
- lastPageButton: when clicked, go to last page
And…
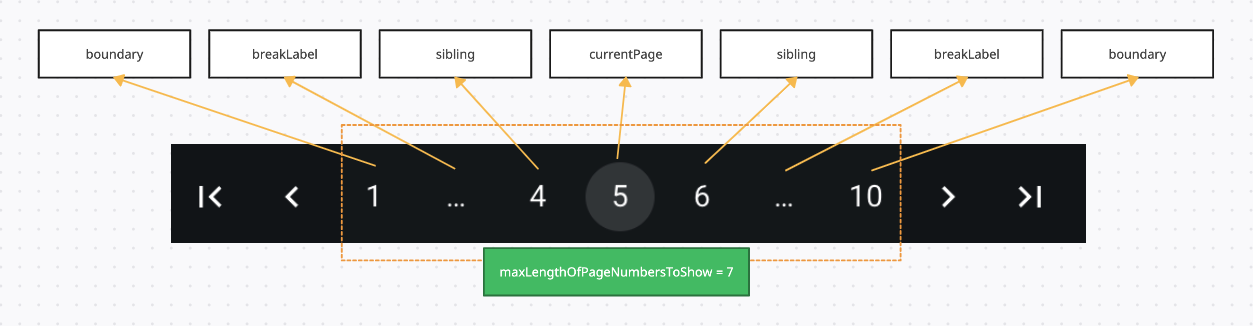
Let’s look deeper into “pageList”, it can break into 4 parts:

- boundary pages: which is page 1 and page 10 in the above image
- breakLabel: which is
...in the above image. - sibling pages: which is page 4 and page 6 in the above image.
- currentPage: which is page 5 in the above image.
To enable parent to fully control the Pagination, the Pagination should at least expose these props to the parent:
1// App.tsx
2
3import { useState } from "react";
4import Pagination from "./Pagination";
5
6function App() {
7	const totalPageCount = 15;
8
9  const [currentPage, setCurrentPage] = useState(1);
10  const onPageChange = (nextPage: number) => {
11    setCurrentPage(nextPage);
12  };
13
14  return (
15    <>
16      currentPage is : {currentPage}
17      <Pagination
18        totalPageCount={totalPageCount}
19        currentPage={currentPage}
20        onChange={onPageChange}
21        // siblingCount={1}
22        // boundaryCount={1}
23        // showFirstButton={true}
24        // showLastButton={true}
25        // showNextButton={true}
26        // showPrevButton={true}
27      />
28    </>
29  );
30}
31
32export default App;
For the parent, the very first thing it should do is to tell the Pagination the total page it has to generate by passing down totalPageCount .
As to control the page change event, declare a react-state which store the currentPage value, and a onPageChange handler which will receive the “next-page number” and set it to the currentPage state. By passing the currentPage and onPageChange handler down to Pagination, the parent should have control over the page change event and its rendering of the current page.
So, our Pagination props type should look like this:
1type PaginationProps = {
2	totalPageCount: number;
3  currentPage: number;
4  onChange: (page: number) => void;
5  siblingCount?: number;
6  boundaryCount?: number;
7  showFirstButton?: boolean;
8  showLastButton?: boolean;
9  showNextButton?: boolean;
10  showPrevButton?: boolean;
11}
totolPageCount: should be a positive integer number, allows Pagination to know how many pages it has to generate. In real life project, it usually comes from data received from the server.currentPage: should be a react-state passed from parent, telling Pagination which page is currently active.onChange: an event triggered whichever the button is clicked, noted thatonChangeshould receive the “next-page number” as param.siblingCount: For example, ifcurrentPageis 8, whilesiblingCountis 2, the left and right siblings page will be 6, 7, 9 and 10. Optional.boundaryCount: For example, ifboundaryCountis 2, whiletotalPageCountis 10, the left and right boundary pages will be page 1, 2, 9 and 10. Optional.- the rest four booleans pretty much demonstrate their purpose by their names. Optional.
With the props type above, let’s start coding the Pagination.
Code our Pagination
After parent and props of Pagination are all settled , let’s start writing some code in Pagniation.tsx :
1// Pagination.tsx
2
3import { Box, Flex } from "@chakra-ui/react";
4import {
5  MdFirstPage,
6  MdLastPage,
7  MdNavigateBefore,
8  MdNavigateNext,
9} from "react-icons/md";
10
11const Pagination = (props: PaginationProps) => {
12  const {
13    totalPageCount,
14    currentPage,
15    onChange,
16    // siblingCount = 1,
17    // boundaryCount = 1,
18    showFirstButton = true,
19    showLastButton = true,
20    showNextButton = true,
21    showPrevButton = true,
22  } = props;
23
24  const pageList = Array.from({ length: totalPageCount }, (_, i) => i + 1);
25  const firstPage = 1;
26  const lastPage = totalPageCount;
27
28  const onNavigateToFirstPage = () => {
29    if (currentPage === 1) return;
30    onChange(firstPage);
31  };
32
33  const onNavigateToPreviousPage = () => {
34    if (currentPage === 1) return;
35    onChange(currentPage - 1);
36  };
37
38  const onNavigateToNextPage = () => {
39    if (currentPage === lastPage) return;
40    onChange(currentPage + 1);
41  };
42
43  const onNavigateToLastPage = () => {
44    if (currentPage === lastPage) return;
45    onChange(lastPage);
46  };
47
48  return (
49    <Flex alignItems={"center"} gap={2}>
50      {showFirstButton && (
51        <Box onClick={onNavigateToFirstPage}>
52          <MdFirstPage size={20} />
53        </Box>
54      )}
55      {showPrevButton && (
56        <Box onClick={onNavigateToPreviousPage}>
57          <MdNavigateBefore size={20} />
58        </Box>
59      )}
60      {pageList.length !== 0 &&
61        pageList.map((page) => (
62          <Box onClick={() => onChange(page)} key={page}>
63            {page}
64          </Box>
65        ))}
66      {showNextButton && (
67        <Box onClick={onNavigateToNextPage}>
68          <MdNavigateNext size={20} />
69        </Box>
70      )}
71      {showLastButton && (
72        <Box onClick={onNavigateToLastPage}>
73          <MdLastPage size={20} />
74        </Box>
75      )}
76    </Flex>
77  );
78};
79
80export default Pagination;
Let me explain what have been done above:
First, we use Array.from to create an array of numbers based on the totalPageCount passed in, it can later be used to render a list of number as our page buttons.
Second, add onClick events to each button, passing the correspond page number to the onChange callback passed from the parent.
Third, there should be some limitation on “first-page button”, “previous-page button”, “next-page button”. For example, when we are in page 1, the “first-page button” and “previous-page button” should be disabled because there is no previous page to go. Add these limitations to the onClick on the above buttons.
Now our Pagination should function well:

When to show the break label?
Up until now, our Pagination is actually done …?,
Well, partially, it functions well as the above gif shows, BUT, you might be thinking, what if the totalPageCount is 100, should we show all 100 pages on screen? No, that’s definitely not what we want.
So, how do we deal with that?
Some people have come up with a smart way to solve this problem: only show the crucial pages we need to see, that is, the “boundary-pages”, “sibling-pages” and “current-page”, while the rest parts, hide it, show the “break-label” as placeholder instead.

To achieve that, we need to do some calculation to our pageList.
What we will do, is to implement a usePaginationList hook, which takes in totalPageCount , currentPage , siblingCount and boundaryCount as params, and return an array for us. The purpose of the hook is to help us do the ugly calculation to decide which pages should be shown and which should be hide.
The returned array will look something like this:
[1, <BreakLabel />, 4, 5, 6, <BreakLabel />, 9]
It should contain all we need to render as pageList on screen:
the “should-show” page numbers and the “break-label” for the rest “should-hide” parts.
Our Pagination code will look like this:
1// Pagination.tsx
2
3const Pagination = (props: PaginationProps) => {
4  const {
5    totalPageCount,
6    currentPage,
7		onChange,
8    siblingCount = 1,
9    boundaryCount = 1,
10    // ...
11  } = props;
12
13  const pageList = usePaginationList({
14    totalPageCount,
15    currentPage,
16    siblingCount,
17    boundaryCount,
18  });
19  const firstPage = 1;
20  const lastPage = totalPageCount;
21
22	// ...
23
24  return (
25    <Flex alignItems={"center"} gap={2}>
26      {/* ... */}
27			{pageList.map((item, idx) => {
28        return typeof item === "number" ? (
29          <Box
30            key={item}
31            onClick={() => onChange(item)}
32          >{item}</Box>
33        ) : (
34          <Fragment key={`${idx} + breakLabel`}>{item}</Fragment>
35        );
36      })}
37      {/* ... */}
38    </Flex>
39  );
40};
41
42export default Pagination;
Iterate over the pageList return by the usePaginationList hook, render the page number if the type of list item is number, or else we render the item as JSX element, which will be the “break-label” component.
BreakLabel component and genArrayOfNumbers function
Before we start building the calculation behind usePaginationList, we can implement <BreakLabel /> and genArrayOfNumbers first.
<BreakLabel /> will simply be a component which renders ... on screen.
1// BreakLabel.tsx
2
3import { Text } from "@chakra-ui/layout";
4
5const BreakLabel = () => {
6	const dots = …
7  return (
8    <Text textAlign={"center"} w={8}>
9      {dots}
10    </Text>
11  );
12};
13
14export default BreakLabel;
genArrayOfNumbers is a helper function which takes in startNum and endNum as params, and return an array of numbers from startNum to endNum . This helper function is useful when the start number isn’t 1.
1// genArrayOfNumbers.ts
2
3const genArrayOfNumbers = (startNum: number, endNum: number) => {
4  const length = endNum - startNum + 1;
5  return Array.from({ length }, (_, i) => startNum + i);
6};
7
8// for example:
9console.log(genArrayOfNumbers(2, 5));
10// log: [2, 3, 4, 5];
Having these done, we can now start our construction on usePaginationList hook!
Implement usePaginationList
As the explanation above, the usePaginationList should take in 4 params: totalPageCount , currentPage , siblingCount and boundaryCount , and return a pageList array which contains page numbers and <BreakLabel /> , if needed.
There are 4 possible cases of combination between page numbers and break labels:
- Showing all the pages:

- Showing break label on the right:

- Showing break label on the left:

- Showing break labels on both side:

Let’s discuss conditions which trigger each cases:
Case 1 “Showing all the pages”:
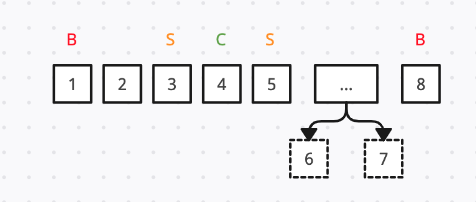
First thing to know is that, we only want to show the break label if the page length between extreme sibling and extreme boundary is greater or equal to 2.
For example, in the below diagram, the page length between left-sibling ( page 3 ) and left-boundary ( page 1 ) is only 1 ( page 2 ), thus we don’t show the break label.
Here’s another example, the page length between left-sibling ( page 4 ) and left-boundary ( page 1 ) is 2 ( page 2 and page 3 ), in this case we show Dots as placeholder for the two hidden pages.
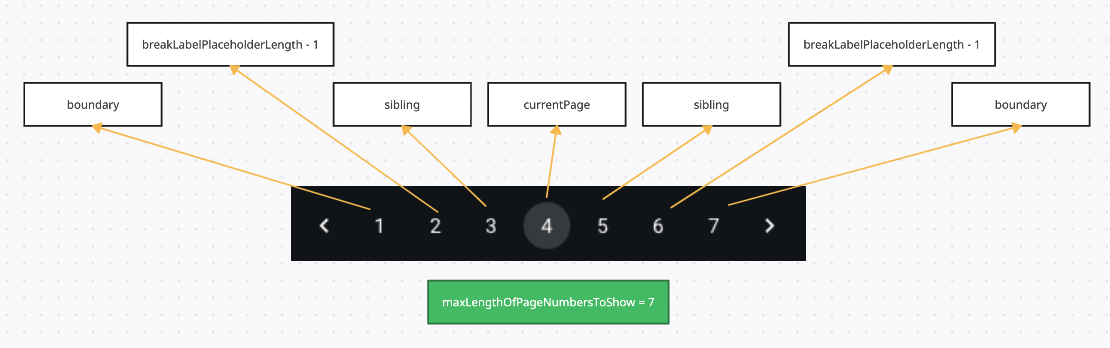
As you may already guessed, to decide whether to show all pages or not, we need to calculate the value of maxLengthOfPageNumbersToShow.
If the totalPageCount is less or equal to this count, then there is no need to show any break label, whereas if the totalPageCount is larger, we will have to hide the some pages, and place break label as placeholder on the UI, this is going to be case 2, 3 and 4, which we will discuss later.
maxLengthOfPageNumbersToShow should be the sum of the length over the “left-boundary pages”, “breakLabelPlaceholderLength - 1”, “left-sibling pages”, “current page”, “right-sibling pages”, “breakLabelPlaceholderLength - 1” and “right-boundary pages”.
Now we can write down the code for CASE 1:
1// usePaginationList.ts
2
3import { useMemo } from "react";
4import { genArrayOfNumbers } from "./genArrayOfNumbers";
5
6type GenPaginationListParams = {
7  totalPageCount: number;
8  currentPage: number;
9  siblingCount: number;
10  boundaryCount: number;
11};
12
13export const usePaginationList = (params: GenPaginationListParams) => {
14  const { totalPageCount, currentPage, siblingCount, boundaryCount } = params;
15
16  const paginationList = useMemo(() => {
17    const firstPage = 1;
18    const lastPage = totalPageCount;
19
20		// if totalPageCount is more than this count
21		// we will have to hide some pages and show Dots instead
22		const currentPageLength = 1;
23		const breakLabelPlaceholderLength = 2;
24		const maxLengthOfPageNumbersToShow =
25	  2 * boundaryCount +
26	  2 * siblingCount +
27	  currentPageLength +
28	  (breakLabelPlaceholderLength - 1) + // left
29	  (breakLabelPlaceholderLength - 1); // right
30
31    // CASE 1: show all page numbers
32    if (totalPageCount <= maxLengthOfPageNumbersToShow) {
33      return genArrayOfNumbers(firstPage, lastPage);
34    }
35
36		// A, CASE 2 ~ 4
37
38  }, [boundaryCount, siblingCount, totalPageCount]);
39
40  return paginationList;
41};
Calculate maxLengthOfPageNumbersToShow first, if totalPageCount is less or equals to it, then we simply render all the page numbers.
Noted that we use useMemo to cache the return paginationList , since the calculation is quit heave, and Pagination is likely to be reused often, it’s better to cache the return value with useMemo .
Case 2, 3, and 4:
If the condition reaches // A, CASE 2 ~ 4 , it means we need to start placing break label into the pageList.
We are going to discuss CASE 2, 3, and 4 together, since they all show break label, the differences between each cases is “where” they place the break label.
Before writing some detail logic, let’s see what our final code is going to look like:
1// usePaginationList.ts
2import BreakLabel from "./BreakLabel";
3
4// ...
5
6export const usePaginationList = (params: GenPaginationListParams) => {
7  const { totalPageCount, currentPage, siblingCount, boundaryCount } = params;
8
9  const paginationList = useMemo(() => {
10		// ...
11
12		// CASE 1: show all page numbers
13    if (totalPageCount <= maxLengthOfPageNumbersToShow) {
14      return genArrayOfNumbers(firstPage, lastPage);
15    }
16
17		// A, CASE 2 ~ 4 starts from here
18
19		const shouldShowLeftBreakLabel: boolean = ...
20    const shouldShowRightBreakLabel: boolean = ...
21
22    // CASE 2: show right break label
23    if(!shouldShowLeftBreakLabel && shouldShowRightBreakLabel){
24      const leftPages = ...
25      const rightBoundaryPages = ...
26      return [...leftPages, <BreakLabel />, ...rightBoundaryPages];
27    }
28
29    // CASE 3: show left break label
30    if (shouldShowLeftBreakLabel && !shouldShowRightBreakLabel) {
31      const leftBoundaryPages = ...
32      const rightPages = ...
33      return [...leftBoundaryPages, <BreakLabel />, ...rightPages];
34    }
35
36    // CASE 4: show break labels on both side
37    if (shouldShowLeftBreakLabel && shouldShowRightBreakLabel) {
38      const leftBoundaryPages = ...
39      const rightBoundaryPages = ...
40      const middlePages = ...
41      return [
42				...leftBoundaryPages,
43				<BreakLabel />,
44				...middlePages,
45				<BreakLabel />,
46				...rightBoundaryPages
47			];
48    }
49
50  return paginationList;
51};
First, let’s see figure out how shouldShowLeftDots and shouldShowRightDots should look like.
As mentioned above, we only show the Dots ( break label ) when the page length between the extreme sibling and the extreme boundary are more than 2 ( breakLabelPlaceholderLength ).
So the code will be this:
1
2const leftExtremeBoundary = boundaryCount;
3const rightExtremeBoundary = lastPage - (boundaryCount - 1);
4
5// using Math.max && Math.min to prevent result from exceeding lastPage
6// and firstPage
7const leftExtremeSibling = Math.max(firstPage, currentPage - siblingCount);
8const rightExtremeSibling = Math.min(lastPage, currentPage + siblingCount);
9
10const shouldShowLeftDots =
11  leftExtremeBoundary + breakLabelPlaceholderLength < leftExtremeSibling;
12const shouldShowRightDots =
13  rightExtremeSibling + breakLabelPlaceholderLength < rightExtremeBoundary;
Now that we know the shouldShowLeftDots and shouldShowRightDots , let’s dive into each cases:
- CASE 2: show right Dots
1// CASE 2: show right Dots
2if (!shouldShowLeftDots && shouldShowRightDots) {
3  const leftPagesLength =
4    boundaryCount +
5    siblingCount * 2 +
6    currentPageLength +
7    (breakLabelPlaceholderLength - 1);
8  const leftPages = genArrayOfNumbers(firstPage, leftPagesLength);
9  const rightBoundaryPages = genArrayOfNumbers(
10    lastPage - boundaryCount + 1,
11    lastPage
12  );
13
14  return [...leftPages, <BreakLabel />, ...rightBoundaryPages];
15}
Since the break label is designated to the right, we only show the boundary pages on the right.
As for leftPages , calculate leftPagesLength first, it is going to be the sum of “left-boundary pages”, “ breakLabelPlaceholderLength - 1”, “left and right sibling pages” and current page.
- CASE 3: show left Dots
1if (shouldShowLeftDots && !shouldShowRightDots) {
2  const leftBoundaryPages = genArrayOfNumbers(firstPage, boundaryCount);
3  const rightPagesStart =
4    lastPage -
5    siblingCount * 2 -
6    (boundaryCount - 1) -
7    (breakLabelPlaceholderLength - 1) -
8    currentPageLength;
9  const rightPages = genArrayOfNumbers(rightPagesStart, lastPage);
10
11  return [...leftBoundaryPages, <BreakLabel />, ...rightPages];
12}
The logic behind CASE 3 is pretty much the same as CASE 2.
- CASE 4: show Dots on both side
1// CASE 4: show Dots on both side
2if (shouldShowLeftDots && shouldShowRightDots) {
3  const leftBoundaryPages = genArrayOfNumbers(firstPage, boundaryCount);
4  const rightBoundaryPages = genArrayOfNumbers(
5    lastPage - (boundaryCount - 1),
6    lastPage
7  );
8  const middlePages = genArrayOfNumbers(
9    currentPage - siblingCount,
10    currentPage + siblingCount
11  );
12  return [
13    ...leftBoundaryPages,
14    <BreakLabel />,
15    ...middlePages,
16    <BreakLabel />,
17    ...rightBoundaryPages,
18  ];
19}
CASE 4 is rather simpler to understand, since we are showing Dots on both side, the pages on boundary and sibling can easily be calculated.
The final code of usePaginationList is here:
1import { useMemo } from "react";
2import { genArrayOfNumbers } from "./genArrayOfNumbers";
3import BreakLabel from "./BreakLabel";
4
5type GenPaginationListParams = {
6  totalPageCount: number;
7  currentPage: number;
8  siblingCount: number;
9  boundaryCount: number;
10};
11
12export const usePaginationList = (params: GenPaginationListParams) => {
13  const { totalPageCount, currentPage, siblingCount, boundaryCount } = params;
14
15  const paginationList = useMemo(() => {
16    const firstPage = 1;
17    const lastPage = totalPageCount;
18
19    // if totalPageCount is more than this count
20    // we will have to hide some pages and show Dots instead
21    const currentPageLength = 1;
22    const breakLabelPlaceholderLength = 2;
23    const maxLengthOfPageNumbersToShow =
24      2 * boundaryCount +
25      2 * siblingCount +
26      currentPageLength +
27      (breakLabelPlaceholderLength - 1) + // left
28      (breakLabelPlaceholderLength - 1); // right
29
30    // CASE 1: show all page numbers
31    if (totalPageCount <= maxLengthOfPageNumbersToShow) {
32      return genArrayOfNumbers(firstPage, lastPage);
33    }
34
35    const leftExtremeBoundary = boundaryCount;
36    const rightExtremeBoundary = lastPage - (boundaryCount - 1);
37    const leftExtremeSibling = Math.max(firstPage, currentPage - siblingCount);
38    const rightExtremeSibling = Math.min(lastPage, currentPage + siblingCount);
39
40    const shouldShowLeftDots =
41      leftExtremeBoundary + breakLabelPlaceholderLength < leftExtremeSibling;
42    const shouldShowRightDots =
43      rightExtremeSibling + breakLabelPlaceholderLength < rightExtremeBoundary;
44
45    // CASE 2: show right Dots
46    if (!shouldShowLeftDots && shouldShowRightDots) {
47      const leftPagesLength =
48        boundaryCount +
49        siblingCount * 2 +
50        currentPageLength +
51        (breakLabelPlaceholderLength - 1);
52      const leftPages = genArrayOfNumbers(firstPage, leftPagesLength);
53      const rightBoundaryPages = genArrayOfNumbers(
54        lastPage - boundaryCount + 1,
55        lastPage
56      );
57
58      return [...leftPages, <BreakLabel />, ...rightBoundaryPages];
59    }
60
61    // CASE 3: show left Dots
62    if (shouldShowLeftDots && !shouldShowRightDots) {
63      const leftBoundaryPages = genArrayOfNumbers(firstPage, boundaryCount);
64      const rightPagesStart =
65        lastPage -
66        siblingCount * 2 -
67        (boundaryCount - 1) -
68        (breakLabelPlaceholderLength - 1) -
69        currentPageLength;
70      const rightPages = genArrayOfNumbers(rightPagesStart, lastPage);
71
72      return [...leftBoundaryPages, <BreakLabel />, ...rightPages];
73    }
74
75    // CASE 4: show Dots on both side
76    if (shouldShowLeftDots && shouldShowRightDots) {
77      const leftBoundaryPages = genArrayOfNumbers(firstPage, boundaryCount);
78      const rightBoundaryPages = genArrayOfNumbers(
79        lastPage - (boundaryCount - 1),
80        lastPage
81      );
82      const middlePages = genArrayOfNumbers(
83        currentPage - siblingCount,
84        currentPage + siblingCount
85      );
86      return [
87        ...leftBoundaryPages,
88        <BreakLabel />,
89        ...middlePages,
90        <BreakLabel />,
91        ...rightBoundaryPages,
92      ];
93    }
94  }, [boundaryCount, siblingCount, totalPageCount, currentPage]);
95
96  return paginationList;
97};
Wrap up
Voilà! Our pagination should now work well.
If you are interested in the complete code base, here’s the repo, I’ve added some styles to it to make the component looks more like the MUI demo.
Here’s the demo link, feel free to try.
Thanks for reading 🎉