In this article, I built a simple react app, setup and implemented unit test to it with Vitest.
TL:DR
- Basic concept of unit testing
- Our simple react app overview
- Vitest setup
- Custom render function
- CASE - basic UI testing with
<App /> - CASE - global component
<SearchBar> - CASE - MSW and React Query hooks
- CASE -
<Posts />with api call - Wrap up 🚀
- Reference
Basic concept of unit testing
Before getting into testing the react app, I want to talk about the very basic concept of unit test.
Let’s take this sum function as our example:
1// sum.ts
2export function sum(a: number, b: number) {
3  return a + b
4}
1// sum.test.ts
2import { sum } from "./sum";
3import { expect, describe, test } from "vitest";
4
5describe("check if sum works well", () => {
6  test("1 add 2 should equal to 3", () => {
7    expect(sum(1, 2)).toBe(3);
8  });
9
10  test("1 add 3 should not equal to 5", () => {
11    expect(sum(1, 3)).not.toBe(5);
12  });
13
14  test("1 add 3 should  equal to 4", () => {
15    // this assertion will pass:
16    expect(sum(1, 3)).toBe(4);
17
18    // this assertion will fail, making the whole test to fail
19    expect(sum(1, 3)).toBe(5);
20  });
21});
As you can see from the above test suite, a unit test consists of 3 parts:
- Description
describe('tests suite name', () => {})- used to name and wrap a series of related tests.
- Test
test('single test name', () => {})- can contain multiple assertions and matchers, if any of the assertion failed, the whole test failed.
- Assertion & Matchers
expect(A).ToBe(B)- place inside a test
- if any of the assertion failed, the test failed
- Assertion refers to
expect - Matchers refers to
.ToBe
Run the test file and you will see this result showing in the terminal:
1// package.json
2"scripts": {
3  "test": "vitest",
4},
1# terminal
2$ npm run test

Now that we know the basic concept of unit test, let’s dive into our react app.
Our simple react app overview
Feel free to checkout and clone the branch starter from the repo here. We will be using the starter app as template, and implement Vitest into it later.
The app is built by React + Vite + TypeScript, along with two common used libraries: React Router DOM and React Query.
It contains 3 pages: a Home page, a Posts page and a Post page.
1// main.tsx
2import React from "react";
3import ReactDOM from "react-dom/client";
4import { RouterProvider, createBrowserRouter } from "react-router-dom";
5import { QueryClient, QueryClientProvider } from "react-query";
6
7import App from "./pages/App.tsx";
8import Posts from "./pages/Posts.tsx";
9import PostPage from "./pages/PostPage.tsx";
10
11const router = createBrowserRouter([
12  {
13    path: "/",
14    element: <App />,
15  },
16  {
17    path: "/posts/",
18    element: <Posts />,
19  },
20  {
21    path: "/posts/:postId",
22    element: <PostPage />,
23  },
24]);
25
26// Create a client
27const queryClient = new QueryClient();
28
29ReactDOM.createRoot(document.getElementById("root")!).render(
30  <React.StrictMode>
31    <QueryClientProvider client={queryClient}>
32      <RouterProvider router={router} />
33    </QueryClientProvider>
34  </React.StrictMode>
35);
Home page contains a button which allows user to navigate to Posts page.
1// App.tsx
2import { useNavigate } from "react-router";
3
4function App() {
5  const navigate = useNavigate();
6
7  return (
8    <div>
9      {'this is Home page'}
10      <div>
11        {'click here to go to Posts page:'}
12        <button onClick={() => navigate("/posts")}>
13          {'Go to Posts page'}
14        </button>
15      </div>
16    </div>
17  );
18}
19
20export default App;
Posts page contains a controlled SearchBar.tsx and a post list which is fetched from the custom useGetPostList hook.
In SearchBar.tsx, user can type into the input to filter the post list, and clear the current input by clicking clear search button.
User can also click each post to navigate to a specific Post page.
1// SearchBar.tsx
2type SearchBarProps = {
3  onChange: (str: string) => void;
4  onClear: () => void;
5  value: string;
6};
7
8const SearchBar = (props: SearchBarProps) => {
9  const { onChange, onClear, value } = props;
10
11  return (
12    <div>
13      {'Search: '}
14      <input value={value} onChange={(e) => onChange(e.target.value)} />
15      <button style={{ marginLeft: "8px" }} onClick={onClear}>
16        {'clear'}
17      </button>
18    </div>
19  );
20};
21
22export default SearchBar;
1// Posts.tsx
2import { useState } from "react";
3import { useNavigate } from "react-router";
4
5import { useGetPostList } from "../hooks";
6import SearchBar from "../components/SearchBar";
7
8const Posts = () => {
9  const navigate = useNavigate();
10
11  const [keyword, setKeyword] = useState<string>("");
12
13  const { data: postList } = useGetPostList();
14
15  const onChange = (str: string) => setKeyword(str);
16
17  const onClear = () => {
18    setKeyword("");
19  };
20
21  return (
22    <div>
23      <SearchBar value={keyword} onChange={onChange} onClear={onClear} />
24      {!postList ? (
25        "loading posts..."
26      ) : (
27        <>
28          {postList
29            .filter((post) => {
30              if (keyword === "") return true;
31              return post.title.includes(keyword);
32            })
33            .map((post, idx) => (
34              <div
35                key={post.id}
36                style={{
37                  display: "flex",
38                  gap: "20px",
39                  alignItems: "center",
40                  marginTop: "10px",
41                  cursor: "pointer",
42                  width: "fit-content",
43                }}
44                onClick={() => navigate(`/posts/${post.id}`)}
45              >
46                <div>{idx}</div>
47                <div>{post.title}</div>
48              </div>
49            ))}
50        </>
51      )}
52    </div>
53  );
54};
55
56export default Posts;
Post page is a page to display the post detail, including title and body fetched from the useGetPost hook.
1// PostPage.tsx
2import { useParams } from "react-router";
3import { useGetPost } from "../hooks";
4
5const PostPage = () => {
6  const { postId } = useParams();
7
8  const { data: post } = useGetPost({ postId });
9
10  return (
11    <div>
12      this is post-page {postId}
13      <div>
14        {!post ? (
15          "loading..."
16        ) : (
17          <>
18            <h3>Title: {post.title}</h3>
19            <p>Body: {post.body}</p>
20          </>
21        )}
22      </div>
23    </div>
24  );
25};
26
27export default PostPage;
As for api, I am going to use JSONPlaceholder, a public api which we can fetch freely. The endpoints we are going to use are:
1[GET] https://jsonplaceholder.typicode.com/posts // for PostList page
2[GET] https://jsonplaceholder.typicode.com/posts/${postId} // for Post page/
1// api.ts
2import { PostType } from "./type";
3
4export const fetchPostList = async () => {
5  try {
6    const resp = await fetch("https://jsonplaceholder.typicode.com/posts");
7    const rst = await resp.json();
8    return rst as PostType[];
9  } catch (err) {
10    return Promise.reject(err);
11  }
12};
13
14export const fetchPost = async ({ postId }: { postId: string }) => {
15  try {
16    const resp = await fetch(
17      `https://jsonplaceholder.typicode.com/posts/${postId}`
18    );
19    const rst = await resp.json();
20
21    return rst as PostType;
22  } catch (err) {
23    return Promise.reject(err);
24  }
25};
1// type.ts
2export type PostType = {
3  userId: number;
4  id: number;
5  title: string;
6  body: string;
7};
I use React Query to help us handle the api response state. Inside hooks.tsx file, I create two custom hooks wrapping over useQuery , by doing this, we can test the hook without repeating to write the same config inside the test files.
1import { useQuery } from "@tanstack/react-query";
2import { fetchPost, fetchPostList } from "./api";
3
4export const useGetPostList = () =>
5  useQuery({
6    queryKey: ["fetchPostList"],
7    queryFn: () => fetchPostList(),
8    refetchOnWindowFocus: false,
9    select: (resp) => {
10      return resp.slice(0, 15);
11    },
12  });
13
14export const useGetPost = ({ postId }: { postId: string | undefined }) =>
15  useQuery({
16    queryKey: ["fetchPost", postId],
17    queryFn: () => fetchPost({ postId: postId as string }),
18    enabled: postId !== undefined,
19    refetchOnWindowFocus: false,
20  });
The complete project tree looks like this:
1.
2├── README.md
3├── index.html
4├── package-lock.json
5├── package.json
6├── public
7│   └── vite.svg
8├── src
9│   ├── api.ts
10│   ├── assets
11│   │   └── react.svg
12│   ├── components
13│   │   └── SearchBar.tsx
14│   ├── hooks.tsx
15│   ├── main.tsx
16│   ├── pages
17│   │   ├── App.tsx
18│   │   ├── PostPage.tsx
19│   │   └── Posts.tsx
20│   ├── type.ts
21│   └── vite-env.d.ts
22├── tsconfig.json
23├── tsconfig.node.json
24└── vite.config.ts
Vitest setup
Now we can start setting up our Vitest environment.
Install Vitest
Install vitest and add a test command to run it.
1$ npm install -D vitest
1"scripts": {
2  "test": "vitest",
3},
Now, by running npm run test , the command will run over every *.test.ts files inside the project, and shows the results in the terminal.
Install React Testing Library, js-dom and jsdom
Since we are going to test the react component, we need to install react-testing-library , js-dom and jsdom.
react-testing-library provides us a way to render the react component in our test file.
js-dom provides lots of useful matcher such as toBeDisabled , toHaveClass , …etc.
jsdom provides an environment for us to run HTML when running our test in the terminal.
1# install jsdom
2$ npm install jsdom --save-dev
3
4# install react-testing-library
5$ npm install @testing-library/react --save-dev
6
7# install js-dom
8$ npm install @testing-library/jest-dom --save-dev
Set jsdom as our test environment
In vite.config.ts file, specify the test environment to jsdom by doing this:
1// ...
2
3export default defineConfig({
4	// ...
5  test: {
6    environment: "jsdom",
7  },
8});
You may encounter warning like below:
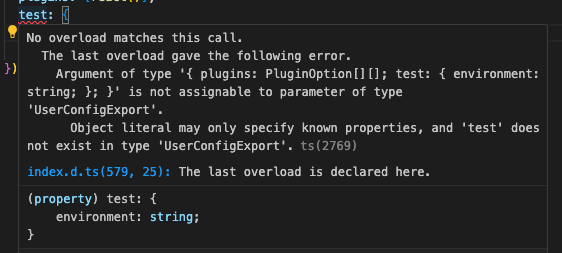
Add this line /// <reference types="vitest" /> into the file and the warning shall resolve:
1/// <reference types="vitest" />
2
3// ...
4
5export default defineConfig({
6	// ...
7  test: {
8    environment: "jsdom",
9  },
10});
Setup react-testing-library and extend js-dom matchers
Create a test directory under src/ , and create a setup.ts file, write these into the file:
1// src/test/setup.ts
2import { afterEach } from "vitest";
3import { cleanup } from "@testing-library/react";
4
5// run the cleanup to clear jsdom after every test
6afterEach(() => {
7  cleanup();
8});
To enable the matchers js-dom provides us, add these into the setup.ts :
1// src/test/setup.ts
2import matchers from '@testing-library/jest-dom/matchers';
3import { expect } from 'vitest';
4
5expect.extend(matchers);
6
7// ...
Lastly, include the setting file into our vite.config.ts file, set globals to true in order to allow all imports from Vitest to be globally, so we don’t have to import the Vitest methods every time.
1/// <reference types="vitest" />
2
3// ...
4
5// https://vitejs.dev/config/
6export default defineConfig({
7	// ...
8  test: {
9		// ...
10    globals: true,
11    setupFiles: "./src/test/setup.ts",
12  },
13});
Now, try to run npm run test to see if any configuration failed, you may encounter this error:
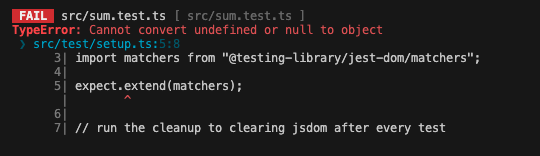
By doing this inside setup.ts can resolve the error:
1// /src/test/setup.ts
2// change:
3import matchers from "@testing-library/jest-dom/matchers";
4
5// to this:
6import * as matchers from "@testing-library/jest-dom/matchers";
You can check the repo branch “setup” to see the code change in this section.
Custom render function
Before diving into CASE - basic UI testing with <App /> section, let’s test if we can successfully render the component in the test file first. Let’s use App.tsx as our first example.
Our first test suite
Create a App.test.tsx file next to it. Then write a describe to create a test suite:
1// /src/pages/App.test.tsx
2describe("App: UI", () => {});
Since we set the test globals to true , we don’t have to import describe from Vitest, but you may notice an TypeScript warning:
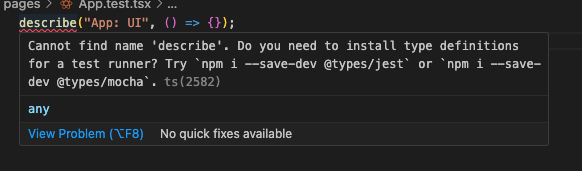
Add this line into our tsconfig.json and the warning shall resolve:
1// tsconfig.json
2
3{
4	// ...,
5	"compilerOptions": {
6		// ...,
7		"types": ["vitest/globals"]
8	}
9}
Now we can use Vitest method without needed to import them in our test files.
Custom render function
Before writing assertions, we need to render the target component first.
1describe("App: UI", () => {
2  test("should renders App", () => {
3    render(<App />);
4  });
5});
When rendering <App /> using the render method, we will encounter an error:
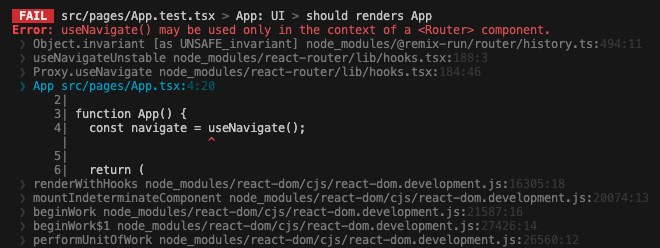
This error is basically saying that we are not wrapping React Router DOM provider outside our <App /> when rendering it in the test, so the useNavigate will throw an error to us.
As you may deduce, when rendering <Posts /> and <PostPage /> , besides React Router DOM error, we will also encounter useQuery error threw by React Query.
To fix the bug, we can write a custom render function by ourselves.
Create a utils.tsx file inside test/ , and write down wrapPageWithProviders and pageRender functions:
1import { render } from "@testing-library/react";
2import { BrowserRouter } from "react-router-dom";
3import { QueryClient, QueryClientProvider } from "@tanstack/react-query";
4
5const createTestQueryClient = () =>
6  new QueryClient({
7    defaultOptions: {
8      queries: {
9        retry: false,
10      },
11    },
12  });
13
14const wrapPageWithProviders = (page: React.ReactElement) => {
15  const testQueryClient = createTestQueryClient();
16  return (
17    <QueryClientProvider client={testQueryClient}>
18      <BrowserRouter>{page}</BrowserRouter>
19    </QueryClientProvider>
20  );
21};
22
23export const pageRender = (page: React.ReactElement) => {
24  const { rerender, ...result } = render(wrapPageWithProviders(page));
25
26  return {
27    ...result,
28		// re-writing the rerender function to make it always rerender
29		// the wrapPageWithProviders(rerenderPage)
30    rerender: (rerenderPage: React.ReactElement) => {
31      return rerender(wrapPageWithProviders(rerenderPage));
32    },
33  };
34};
In the above code, we create a test-used queryClient , then create a wrapper function wrapPageWithProviders which wraps the page passed in with the QueryClientProvider and BrowserRouter, after that, we write a custom render function pageRender to render the page with the wrapper.
Go back to the test file, switch the render method from render to pageRender , the error should be resolved.
1import { screen } from "@testing-library/react";
2import App from "./App";
3
4import { pageRender } from "../test/utils";
5
6describe("App: UI", () => {
7  test("should renders App", () => {
8    pageRender(<App />);
9  });
10});
screen.debug() method
If you are not sure if the component you rendered is the right target, maybe you will want to try screen.debug().
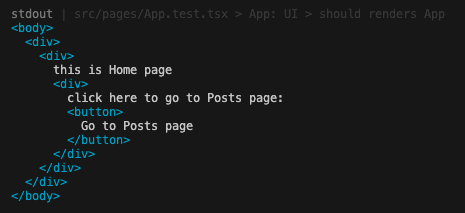
It is a useful helper function which logs the DOM rendered in the test inside the terminal. By checking the log, we can make sure we are rendering the right component.
1import { screen } from "@testing-library/react";
2
3test("should renders App", () => {
4  pageRender(<App />);
5
6	screen.debug()
7});
8
9// should log the DOM of <App /> inside terminal:
CASE - basic UI testing with <App />
After all this setup, we can finally start testing our react app.
We will start from the very basic: UI test.
Let’s stick with App.test.tsx file. Before writing test, let’s give some data-testid to the node inside App.tsx component so we can grab specific element and test if they are being rendered.
1function App() {
2	// ...
3  return (
4    <div data-testid="app">
5      {'this is Home page'}
6      <div>
7        {'click here to go to Posts page:'}
8        <button data-testid="app__link" onClick={/*...*/}>
9          {'Go to Posts page'}
10        </button>
11      </div>
12    </div>
13  );
14}
1test("should renders App", () => {
2  pageRender(<App />);
3
4  const app = screen.getByTestId("app");
5  expect(app).toBeInTheDocument();
6});
You may encounter a Typescript warning here:
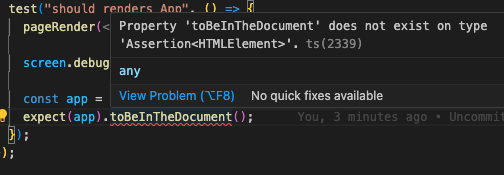
Add @testing-library/jest-dom into tsconfig.json and the warning should be resolved:
1// tsconfig.json
2{
3	"compilerOptions": {
4		// ...
5    /* Vitest */
6    "types": [..., "@testing-library/jest-dom"]
7  },
8}
We can also test if the button is being rendered and is clickable:
1test("should renders link and being able to be clicked", () => {
2  pageRender(<App />);
3
4  const link = screen.getByTestId("app__link");
5  expect(link).toBeInTheDocument(); // check is being rendered
6  expect(link).not.toBeDisabled(); // check is clickable
7});
You can also test on an element’s children:
1test("should only have one children node inside app", () => {
2  pageRender(<App />);
3
4  const app = screen.getByTestId("app");
5  expect(app.children.length).toBe(1);
6});
You may find that we are repeatedly rendering the same <App /> in each test cases, Vitest actually provides us a method called beforeEach which gives us a way to do something before each tests trigger, in our case, we can render <App /> before each tests:
1describe("App: UI", () => {
2  beforeEach(() => {
3    pageRender(<App />);
4  });
5
6  test("should renders App", () => {
7    const app = screen.getByTestId("app");
8    expect(app).toBeInTheDocument();
9  });
10
11  test("should renders link and being able to be clicked", () => {
12    const link = screen.getByTestId("app__link");
13    expect(link).toBeInTheDocument();
14    expect(link).not.toBeDisabled();
15  });
16
17  test("should only have one children node inside app", () => {
18    const app = screen.getByTestId("app");
19    expect(app.children.length).toBe(1);
20  });
21});
You may be thinking: if we need to render the component before each test, shouldn’t we cleanup the DOM afterward so that DOM being rendered in each tests won’t mess up altogether? You are right, be we actually have already done the cleanup inside the setup.ts file:
1// /stc/test/setup.ts
2
3// run the cleanup to clearing jsdom after every test
4afterEach(() => {
5  cleanup();
6});
So we don’t have to do the cleanup each time!

That’s it for the basic UI test. Feel free to checkout the branch case/UI repo here.
Now we can dive into testing our global component: SearchBar.tsx .
CASE - global component <SearchBar/>
In real world react app, we often see global components or shared components, usually all the components’ props are passed from the parent in order to make the components easier to control and reused.
In this section, I am going to test <SearchBar />, which is sort of a global component that we have to pass onChange , onClear and value into it to control it. Let’s get started.

First things first, let’s write data-testid to the target node:
1// ...
2
3const SearchBar = (props: SearchBarProps) => {
4  // ...
5
6  return (
7    <div data-testid="search-bar">
8      {'Search:'}{" "}
9      <input
10        data-testid="search-bar__input"
11        // ...
12      />
13      <button
14        data-testid="search-bar__clear-btn"
15        // ...
16      >
17        {'clear'}
18      </button>
19    </div>
20  );
21};
22
23// ...
Create a SearchBar.test.tsx file next to it:
1// SearchBar.test.tsx
2import { render } from "@testing-library/react";
3import SearchBar from "./SearchBar";
4
5describe("globalComponent: SearchBar", () => {
6  const mockValue = {
7    initValue: "initValue",
8    newValue: "newValue",
9  };
10  const mockProps = {
11    onChange: vi.fn(),
12    onClear: vi.fn(),
13    value: mockValue.initValue,
14  };
15
16  beforeEach(() => {
17    render(<SearchBar {...mockProps} />);
18  });
19
20  // write tests down here...
21});
Since <SearchBar /> takes in several props, we will have to mock them by ourselves when rendering the component. vi.fn() is a method Vitest provides which help us spy on the function to see if it’s being called.
You may notice the render method we are using here isn’t the custom function pageRender we wrote before, this is because inside the SearchBar /> component, there’s no calling on either useQuery , useNavigate or hooks from React Query and React Router DOM, so we can render the component with the render method React Testing Library provides us.
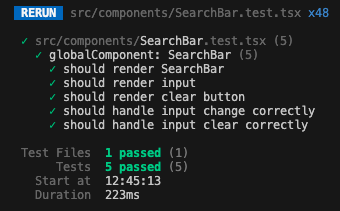
We will test these several cases:
1// SearchBar.test.tsx
2
3// these 3 tests are for UI testing
4test("should render SearchBar", () => {});
5test("should render input", () => {});
6test("should render clear button", () => {});
7
8// these 2 tests are for user-event testing
9test("should handle input change correctly", () => {});
10test("should handle input clear correctly", () => {});
Start from testing the container:
1import { screen } from "@testing-library/react";
2
3test("should render SearchBar", () => {
4  const container = screen.getByTestId("search-bar");
5  expect(container).toBeInTheDocument();
6});
Next we test the input UI:
1test("should render input", () => {
2  const input = screen.getByTestId("search-bar__input");
3  expect(input).toBeInTheDocument();
4  expect(input.getAttribute("placeholder")).toBe(null);
5  expect(input).toHaveValue(mockProps.value);
6});
In the above test, I test if the input has placeholder by checking whether the placeholder is null or not; I also check whether the input has the initial value as the props passed in.
Next we test the clear button:
1test("should render clear button", () => {
2  const clearBtn = screen.getByTestId("search-bar__clear-btn");
3  expect(clearBtn).toBeInTheDocument();
4  expect(clearBtn.innerHTML).toBe("clear");
5});
In the above test, I also test whether the button contains "clear" string inside.
Now that we finish UI test, we can start implement user event tests. Let’s start by the onChange event:
1test("should handle input change correctly", () => {
2  const input = screen.getByTestId("search-bar__input");
3
4  fireEvent.change(input, { target: { value: mockValue.newValue } });
5  expect(mockProps.onChange).toBeCalledWith(mockValue.newValue);
6});
First we fire the change event on the input with mockValue.newValue , then by checking if the mockProps.onChange is being called with the mockValue.newValue we can know if the onChange is being properly called.
Noted that writing this won’t work:
1expect(input).toHaveValue(mockValue.newValue);
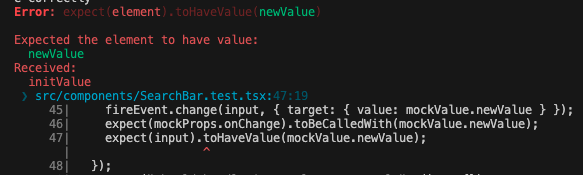
I don’t quit understand the proper reason why the above assertion won’t work. If you check the document of React Testing Library, it actually recommends another library called user-event , which mocks the user event more smoothly. But in this article, we will just stick with fireEvent.
Finally, let’s test the onClear event:
1test("should handle input clear correctly", () => {
2  const clearBtn = screen.getByTestId("search-bar__clear-btn");
3  fireEvent.click(clearBtn);
4  expect(mockProps.onClear).toHaveBeenCalledOnce();
5});
We check whether the mockProps.onClear is being called to see if the click event is properly triggered.
That’s it for this section, feel free to check out the branch “case/searchBar” in the repo.
CASE - MSW and React Query hooks
Before diving into <Post /> and <PostPage /> , I am going to write tests on our two custom React Query hooks: useGetPostList and useGetPost . What the two hooks do is to fetch the api and return an object including data and the fetch state for us.
MSW and node version
You might be thinking, should we fetch the same JSONPlaceholder api when running the test on the query hooks? Well, half right, we will be using a library called MSW ( Mock Service Worker ), it’s a library that allows us to mock our own api endpoint and response data. What MSW does, is when fetch an api endpoint, it intercepts the request and return the defined mock response. Knowing the concept, let’s get started.
1# terminal
2npm install msw --save-dev
Noted that if the node version is lower than 18, MSW will throw an error. If you want to upgrade your node version, you can check this article: Upgrading Node.js to latest version.
Also, in case you would like to check the references yourself, the following steps are generally the same as the msw document and this repo: testing-react-query, the repo is a Vitest example on testing useQuery written by the maintainer of React Query.
Mock handlers
Let's mock the handlers first, touch a new file called handlers.ts inside test/ , and write down the mocking handlers and responses:
1// src/test/handlers
2
3import { HttpResponse, http } from "msw";
4import { PostType } from "../type";
5
6export const mockPostList: PostType[] = [
7  {
8    userId: 1,
9    id: 1,
10    title: "mock title",
11    body: "mock body",
12  },
13  {
14    userId: 2,
15    id: 2,
16    title: "mock title_2",
17    body: "mock body_2",
18  },
19  {
20    userId: 3,
21    id: 3,
22    title: "mock title_3",
23    body: "mock body_3",
24  },
25  {
26    userId: 4,
27    id: 4,
28    title: "mock title_4",
29    body: "mock body_4",
30  },
31  {
32    userId: 5,
33    id: 5,
34    title: "mock title_5",
35    body: "mock body_5",
36  },
37];
38
39export const mockEndpoints = {
40  getPostList: "*/posts",
41  getPost: "*/posts/:postId",
42};
43
44export const handlers = [
45  // postList
46  http.get(mockEndpoints.getPostList, () => {
47    return HttpResponse.json(mockPostList);
48  }),
49  // post
50  http.get(mockEndpoints.getPost, ({ params }) => {
51    const { postId } = params;
52    return HttpResponse.json(
53      mockPostList.find((post) => post.id === Number(postId))
54    );
55  }),
56];
Mock server
After that, go to src/test/setup.ts file, setup our mock server there:
1// src/test/setup.ts
2
3//...
4
5import { setupServer } from "msw/node";
6
7export const server = setupServer(...handlers);
8
9// Establish API mocking before all tests.
10beforeAll(() => server.listen());
11// Reset any request handlers that we may add during the tests,
12// so they don't affect other tests.
13afterEach(() => server.resetHandlers());
14// Clean up after the tests are finished.
15afterAll(() => server.close());
Noted that setupServer is imported from msw/node instead of msw.
What the mock server does is to intercept the api calls and return the mock response when inside the test environment. Make sure the api endpoints you are hitting has already been defined inside the handlers array.
Testing on query hooks - Success
Create a file called hook.test.tsx next to hook.tsx, and write this:
1describe("query hook: useGetPostList", () => {
2  test("successful query hook", async () => {
3    const { result } = renderHook(() => useGetPostList(), {
4      wrapper: createQueryTestWrapper(),
5    });
6  });
7
8	// ...
9});
Since the hook only works inside the react component, before writing assertion, we have to render the hook first. React Testing Library provides us a method called renderHook in order to test pure hook function. As the above code is written, the hook has to have a wrapper, so let’s create one inside src/test/urils.tsx :
1export const createQueryTestWrapper = () => {
2  // reuse createTestQueryClient as we declared in the previous section
3	const testQueryClient = createTestQueryClient();
4  return ({ children }: { children: React.ReactNode }) => (
5    <QueryClientProvider client={testQueryClient}>
6      {children}
7    </QueryClientProvider>
8  );
9};
After creating the hook wrapper, we can start testing the hook:
1test("successful query hook", async () => {
2  const { result } = renderHook(() => useGetPostList(), {
3    wrapper: createQueryTestWrapper(),
4  });
5
6  // !!NOTE: need to waitFor the query to resolve
7  await waitFor(() => expect(result.current.isSuccess).toBe(true));
8
9  // then we test the result
10  expect(result.current.data?.length).toBe(mockPostList.length);
11  if (result.current.data) {
12    expect(result.current.data[0].title).toBe(mockPostList[0].title);
13    expect(result.current.data[1].title).toBe(mockPostList[1].title);
14  }
15});
Noted that the test will be an async function, since we are going to await the waitFor function, which will run the assertion when the query resolved. After query resolved, we can test if the data is defined by checking the length, data content …etc.
Testing on query hooks - Failure
In order to mock error response from the server, we first have to create an error response inside the test function:
1test("failure query hook", async () => {
2  server.use(
3    http.get(mockEndpoints.getPostList, () => {
4      return HttpResponse.error();
5    })
6  );
7
8  // ...
9});
Noted that the endpoint has to be the same as the endpoint useGetPostList is hitting.
Then render the hook:
1test("failure query hook", async () => {
2	// ...
3
4  const { result } = renderHook(() => useGetPostList(), {
5    wrapper: createQueryTestWrapper(),
6  });
7
8	// ...
9});
Lastly, we await the result to be resolved, and check if the isError is true:
1test("failure query hook", async () => {
2  // ...
3
4  // !!NOTE: need to waitFor the query to resolve
5  await waitFor(() => expect(result.current.isError).toBe(true));
6  // then we test the result
7  expect(result.current.error).toBeDefined();
8});
The whole test suite for useGetPostList is here:
1import { renderHook, waitFor } from "@testing-library/react";
2import { HttpResponse, http } from "msw";
3
4import { useGetPostList } from "./hooks";
5import { createQueryTestWrapper } from "./test/utils";
6import { mockEndpoints } from "./test/handlers";
7import { server } from "./test/setup";
8
9describe("query hook: useGetPostList", () => {
10  test("successful query hook", async () => {
11    const { result } = renderHook(() => useGetPostList(), {
12      wrapper: createQueryTestWrapper(),
13    });
14
15    // !!NOTE: need to waitFor the query to resolve
16    await waitFor(() => expect(result.current.isSuccess).toBe(true));
17
18    // then we test the result
19    expect(result.current.data?.length).toBe(mockPostList.length);
20    if (result.current.data) {
21      expect(result.current.data[0].title).toBe(mockPostList[0].title);
22      expect(result.current.data[1].title).toBe(mockPostList[1].title);
23    }
24  });
25
26  test("failure query hook", async () => {
27    server.use(
28      http.get(mockEndpoints.getPostList, () => {
29        return HttpResponse.error();
30      })
31    );
32
33    const { result } = renderHook(() => useGetPostList(), {
34      wrapper: createQueryTestWrapper(),
35    });
36
37    // !!NOTE: need to waitFor the query to resolve
38    await waitFor(() => expect(result.current.isError).toBe(true));
39    // then we test the result
40    expect(result.current.error).toBeDefined();
41  });
42});
In this section, we’ve setup the MSW and mock our handlers to test the query hooks, on the next section, we are going to test the <Posts /> page using the mock handlers we’ve defined here.
I’ve also written the test for useGetPost hook, if you’re interested in that, check out the branch case/msw_reactQuery here.
That’s it for this section!
CASE - <Posts /> with api call
In this section, we are going to implement tests on <Posts /> . We are going to test the UI first, then we will await for the fetch call to be resolved or failure, and check if the UI rendered with the response as same as our expectation.
In <Posts /> , let’s give the target node some testId:
1// Posts.tsx
2
3// ...
4
5const Posts = () => {
6  // ...
7
8  const { data: postList } = useGetPostList();
9
10  return (
11    <div data-testid="posts">
12      <SearchBar value={keyword} onChange={onChange} onClear={onClear} />
13      {!postList ? (
14        <div data-testid="posts__loading">{'loading posts...'}</div>
15      ) : (
16        <div data-testid="posts__list-container">
17          {postList
18            .filter((post) => {
19              if (keyword === "") return true;
20              return post.title.includes(keyword);
21            })
22            .map((post, idx) => (
23              <div>
24                {/* ... */}
25              </div>
26            ))}
27        </div>
28      )}
29    </div>
30  );
31};
32
33export default Posts;
Noted that I added new divs to the loading string and post list as their containers, if we don’t do that, we won’t be able to grab the nodes inside our tests.
After that, I added testId on the outer div, loading div and the post list div.
Now we can start writing the tests. Let’s test if the outer div is correctly rendered:
1// Posts.test.tsx
2import { screen, waitFor } from "@testing-library/dom";
3
4import { pageRender } from "../test/utils";
5import Posts from "./Posts";
6
7describe("Posts: UI", () => {
8  test("render loading string initially", () => {
9    pageRender(<Posts />);
10
11    const pageContainer = screen.getByTestId("posts");
12    expect(pageContainer).toBeInTheDocument();
13
14    const loading = screen.getByTestId("posts__loading");
15    expect(loading).toBeInTheDocument();
16  });
17});
We check if the container is correctly rendered, then check if the loading string is also in the document.
After checking the initial UI, we can start test the UI with fetch response.
How do we mock the fetch-resolve situation? Well, we await the the UI by using the api findByTestId React Testing Library provides us. It’s a method which returns a Promise element to us, we can await the UI until it renders the fetch response by using this method.
The
findBysearch variant is used for asynchronous elements which will be there eventually
By awaiting the UI, we can make sure the useQuery is being successfully called and resolved, then check if the UI has rendered the mockPostList we defined in the previous chapter.
1// Posts.test.tsx
2
3// ...
4import { mockPostList } from "../test/handlers";
5
6// ...
7
8test("render post list after query success", async () => {
9  const result = pageRender(<Posts />);
10
11	// await the container first by using findByTestId
12  const listContainer = await result.findByTestId("posts__list-container");
13
14  // then check the response content
15  expect(listContainer).toBeInTheDocument();
16  expect(listContainer.children.length).toBe(mockPostList.length);
17});
You can also use the waitFor method, in this case we do not have to use findByTestId, we can simply grab the node by using the getByTestId method:
1import { waitFor } from "@testing-library/dom";
2
3test("render post list after query success", async () => {
4  const result = pageRender(<Posts />);
5
6	await waitFor(() => {
7	  const listContainer = result.getByTestId("posts__list-container");
8
9	  expect(listContainer).toBeInTheDocument();
10	  expect(listContainer.children.length).toBe(mockPostList.length);
11	});
12});
After testing on the query success case, we can test on the query failure case:
1import { mockEndpoints } from "../test/handlers";
2import { server } from "../test/setup";
3import { HttpResponse, http } from "msw";
4
5test("should still render loading string after query failure", async () => {
6  server.use(
7    http.get(mockEndpoints.getPostList, () => {
8      return HttpResponse.error();
9    })
10  );
11
12  const result = pageRender(<Posts />);
13
14  await waitFor(() => {
15    const loadingString = result.getByTestId("posts__loading");
16    expect(loadingString).toBeInTheDocument();
17  });
18});
Just like we did when testing useGetPostList failure case, we mock the fetch error here, await the fetch to be rejected by using waitFor method, then check if the loading string is still in the document.
I’ve also add tests to <PostPage /> , it’s a little bit more complicated than <Posts /> page, since you will have to pass a mockPostId into the page in order to trigger the useGetPost query to work, but forgive me for skipping the process in this section, the way to test that page is the almost the same as the <Posts /> page, you can check the branch case/posts to see the complete code.
That’s it for this section.
Wrap up 🚀
In this article, we’ve only covered some common and basic cases of unit test with Vitest, React Testing Library and MSW. If you are interested in how to test a rather more complicated component with methods provided by React Testing Library, I highly recommend you go read this article: React Testing Library Tutorial written by ROBIN WIERUCH. It provides more detailed explanations on each methods and use cases.
Feel free to clone the complete code from the main branch of this repo.
That’s it, hope you enjoy this article, thanks for reading 🛶
Reference
- Vitest - Getting Started
- {JSON} Placeholder
- Vitest with React Testing Library
- Vitest defineConfig, 'test' does not exist in type 'UserConfigExport'
- @testing-library/jest-dom
- Using Testing Library jest-dom with Vitest
- Export Vitest extend-expect
- testing-react-query
- React Testing Library Tutorial
- testing-library-User Interactions-Introduction
- Mock Service Worker
- MSW-http
- MSW-Debugging runbook
- Upgrading Node.js to latest version